


Overview
| Color | Stainless Steel |
| Brand | DLX |
| Item dimensions L x W x H | 5 x 2.75 x 1.5 inches |
| Manufacturer | Deployed Logix |
| UPC | 850069011024 |
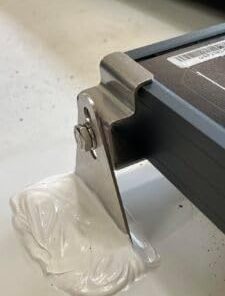
- A two piece stainless steel mount allows for panels to be tilted and removed from mounting surface for servicing and increased low horizon light production
- What you get: 4x Mount Adapter 35mm or 40mm; 4x L Foot-3 Hole; 8x Bolt-Hex 1/4-20×1/2 SS; 4x Nut-Nylock 1/4-20 SS; 4x Washer-Split 1/4″ SS; 8x Screw-#10×3/4″ PHP SMS SS; 10x 3M VHB Tape-4950
- Clean the mounting surface with 91% isopropyl alcohol. Place the panel with mounts on the roof, positioning it while mounts are semi-loose to allow natural alignment. Gradually tighten each bolt, keeping the L-Foot in position. Lift the panel, peel the tape cover off each mount foot, and place the panel back in the exact spot. Ensure each foot is flat; loosen knobs for adjustments if needed. Apply sealant (e.g., Terroson 5510 for non-TPO, Dicor 502LSW for TPO) to fully cover each mount foot.
Related Searches
what our customer say this product:
Powered by
| 5 star | 100% | |
| 4 star | 0% | |
| 3 star | 0% | |
| 2 star | 0% | |
| 1 star | 0% |
Only logged in customers who have purchased this product may leave a review.
Related products
Sale!


Original price was: $2,232.80.$893.12Current price is: $893.12.
Sale!


Original price was: $730.87.$292.35Current price is: $292.35.
Sale!


Solar & Wind Power
Solar Panel 10AWG Tinned Copper Cable to Anderson Connector 2FT
Original price was: $100.00.$55.00Current price is: $55.00.
Sale!


Original price was: $573.23.$229.29Current price is: $229.29.
Sale!


Original price was: $569.07.$227.63Current price is: $227.63.
Sale!


Original price was: $317.89.$143.05Current price is: $143.05.
Sale!


Original price was: $898.90.$359.56Current price is: $359.56.
Sale!


Original price was: $84.52.$50.71Current price is: $50.71.
Andy Baird Verified Buyer –
These appear to be identical to the mounting feet that were sold by AM Solar. I’ve used those on several rigs, and they’re certainly sturdy.
My only complaint is that the feet only give you three square inches of mounting surface, and if you’re mounting with VHB tape, that doesn’t seem like a lot… unless you screw the feet to the roof. I like to minimize roof penetrations so my practice is to mount with tape, and screw down the front two feet of each panel, for extra insurance against lift-off.
Note: if you plan to tilt panels mounted with these, you’ll have to find or make tilt bars like the ones AM Solar used to sell. You’ll want 1/4-20 knobs if you plan to undo these regularly.
Oh–DON’T use stainless steel screws to put these brackets together, unless you slather the threads with Tef-Gel. I can tell you from experience that if you don’t, and they gall, you’ll be hacksawing them apart and then buying new panel brackets.